Page 15 of 33
Re: A Kiwis Series 3
Posted: Fri Feb 03, 2017 7:36 pm
by Hobbawobba
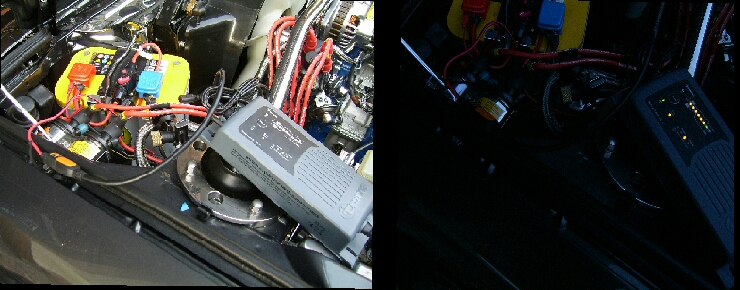
Thanks guys. Took a lot longer than expected.. But oh well! I forgot to mention I moved my fusible links to the inside of my firewall also.. Just to free up the little bit more clutter of the engine bay

. I'd like to get my hands on a spare series 3 axle at some point so I can refresh/rebuild/upgrade that while mine is still on the car.. Then swap it straight over one afternoon. See what happens. Also starting to plan an engine build. 13b Bridge with ITB's and Megsasquirt is the thought I keep having

. Although FC turbo swap could be appealing? Decisions. Anybody got an opinion? Haha
DKWW2000 wrote:LOOKING GOOD

You have certainly been busy, I like the adjusting arm on the Alternator & all the shiny alloy, are the window relays standard 4 pin?
They are 5 pin changeover relays! I'll try do a little writeup for this also or find some diagrams/links I got influence from

.
gt_james wrote:Zip ties on brake lines, wonder which idiot did that

Some random guy tryna help me rush my car back together for Japfest. What a fail that was. Damn copper washer being pinched on the axle

spirit r wrote:The results of your hydraulic crimpers

200A Fuse is big enough?
Hot update, thanks for sharing.
The crimpers were brilliant! Stoked as with them aye haha. The cranking amps pulled by the starter through that cable can be ridiculously high! The circuit breaker makes it nice to do electric stuff on the car also.. Press the button and +12v is cut off. Put it back in and you have power again.
ian65 wrote:Great work there Jesse. How are you finding the polybushed rear end? Polys transformed the 2 FB's I've done with them.
Well I only have them done in the completely rear end. But they feel awesome! Makes the car feel so much more solid and together. Can't wait until I get around to sorting my front end aye!
Re: A Kiwis Series 3
Posted: Fri Feb 03, 2017 8:36 pm
by myatt1972
Wow Jesse, you have been busy !
Great work, can't beat getting shiny bits fitted. Keep the updates coming, you're building an awesome car there
Re: A Kiwis Series 3
Posted: Mon Feb 13, 2017 1:22 pm
by Hobbawobba
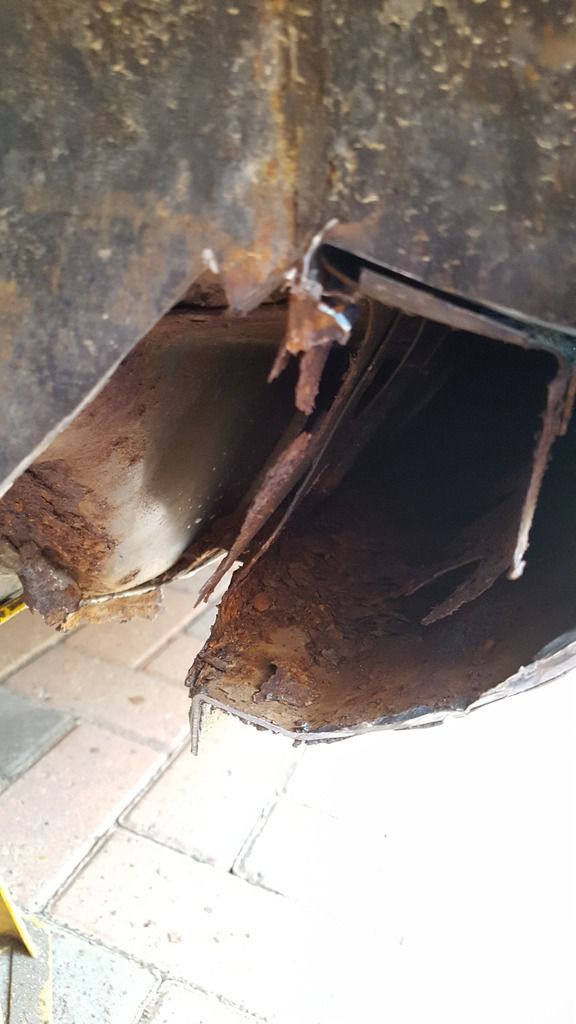
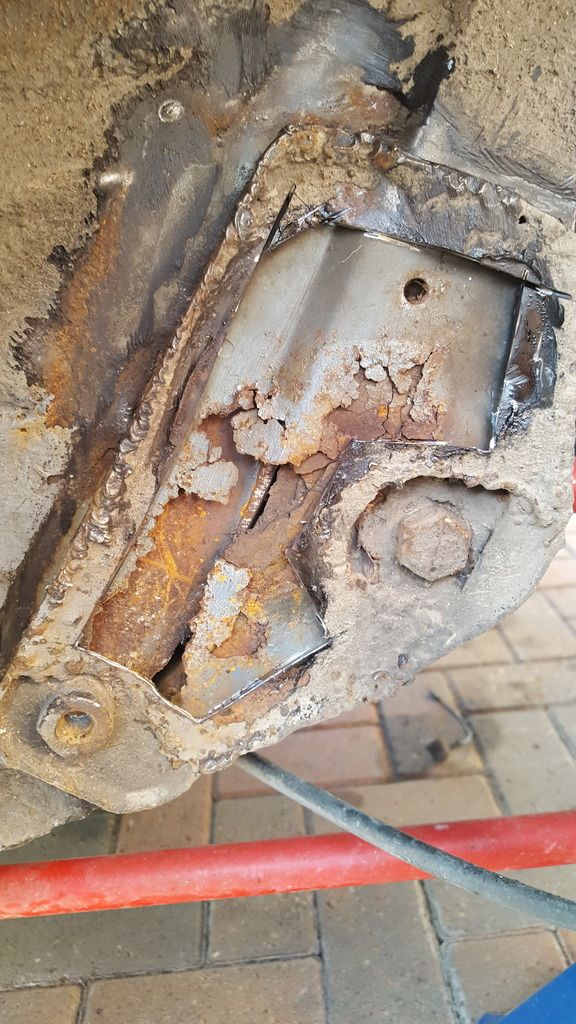
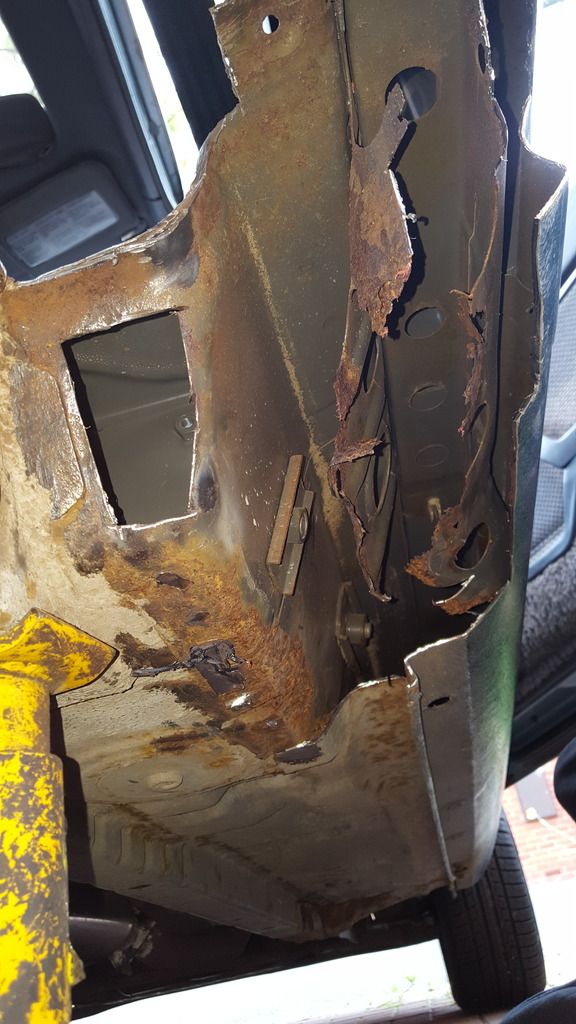
Just got back from an MOT. Failed on rear suspension mount rust

. I just want to have a drive! I think it's going to be a bit like what Nik just posted in his thread. Probably be a good few months work for me.. Hopefully I'll be able to sort it out before RRG - if the weather decides to warm up :x. They said my rear wheel bearings could do with being changed also which happened a couple years ago haha.. Does anybody have a spare series 3 axle? As I've been wanting to completely rebuild that and swap it over anyway, rather than take mine apart aye!
On a side note. The lumpy idle/revs cleared up after a mile or so. Idle needs some adjustment though. Nothing is leaking. Gilmer sounds nice but could probably be tightened slightly and keep an eye to make sure its not excessively wearing the belt. Oil temps are solid as at about 91 which I'm pretty stoked with.
Re: A Kiwis Series 3
Posted: Tue Feb 14, 2017 6:27 pm
by Lucky
Hobbawobba wrote:Just got back from an MOT. Failed on rear suspension mount rust
. I just want to have a drive! I think it's going to be a bit like what Nik just posted in his thread. Probably be a good few months work for me..
I hope not

To be honest, even if I could weld (rather than blow holes in stuff) there's no way I'd have tried to repair the rust in mine. It's the making up panels that the real skill's in, and I'm lucky to have guys with decades of bodyshop experience just up the road. If it hadn't been for them, I'd have had no chance
Re: A Kiwis Series 3
Posted: Wed Feb 15, 2017 4:14 pm
by Hobbawobba
Yeah it is fairly bad

. I'll get some pictures at some point. I've always wanted to learn how to weld so it should be some intense practice for me!
Already got some sheet steel and a hammer - that'll do won't it?
hahahah. I did learn quite a lot from welding up my other suspension mount so hopefully shouldn't be too bad
Re: A Kiwis Series 3
Posted: Thu Mar 16, 2017 6:34 pm
by spirit r
Jesse your red top optima battery need a charging voltage from about 14,4 V for a full load up.
The battery is not a wet type it is a AGM type battery. The battery is now far away from your alternator so you lost some voltage level. Do you have ever measured the charging voltage with working engine?
There is a possibility for a full charging with an extern charger like Cetek or Truma BC 10 with a special quicker charge for the optima AGM battery and control panel show you how full your battery is.
- Untitled.jpg (214.13 KiB) Viewed 6190 times
Re: A Kiwis Series 3
Posted: Fri Mar 17, 2017 6:09 pm
by Hobbawobba
Thanks for that post Thomas! I did check the voltage when I got it all running and I believe it was spot on!
The car is in bits again though while I sort the welding out so the battery is in my bedroom
. I would like to get one of those Ctek chargers though.
I attacked my sills and arches with a screwdriver last week after failing my MOT. Thankfully these pieces aren't visible so don't need to be perfectly straight and pretty!
I've got 2 outer repair panels coming from Steve who people have linked to on this forum before.
Passengers sill.A lot of that is just loose flaked off bits of rust There's some more underneath the rear seats in a weird spot which I need to figure out too.

Driver side is a little worse
. Discovered a bodge patch over the suspension mounting plate also.. At least I've done the other side and it shouldn't be too hard this time.

Got another little piece I'm playing around with. Hopefully it works out so I can post some pics soon

Re: A Kiwis Series 3
Posted: Fri Mar 17, 2017 7:05 pm
by DKWW2000
It seems like you are working in a logical way, by the time you have finished you will be welding as a sideline, the more you do the easier it becomes. It might be a good idea to drill a small hole in all the areas you will have attacked with heat to spray some old diesel engine oil inside as that will stop them rusting from inside. It will be worth it.
Re: A Kiwis Series 3
Posted: Fri Apr 14, 2017 6:33 pm
by Hobbawobba
Thanks Pete. I'll keep that in mind aye!
Making slow progress. I kept having days off that were rubbish weather. At least I'm learning about what to cut out and what to leave!
It will help the other side go quicker. Got most of the drivers side rust out. I'll bang up some quick panels and try get them welded in. I really want to make this Mazda HQ event in May. Not sure if I'll be done in time
I may even just weld it up to pass MOT, then chop it back out to finish it properly, just to make it?!

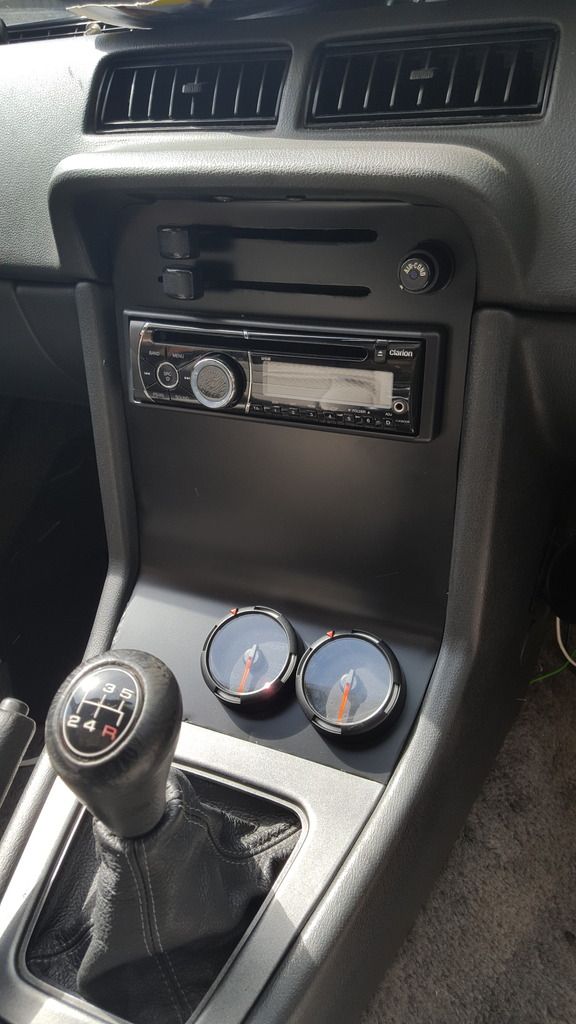
I had my Defi oil temperature gauge mounted in the supplied sticky backed pod which wasn't bad. But I really want to have a clean setup
. I decided to make my own gauge panel. I don't use the clock, cubby hole or ash tray in the standard panel so figured I could delete them. I have the rear defrost and headlight switches behind the panel as they hardly get used and I'll just reach around(

) if I ever need to use them
. There are a few imperfections from where the vice grips clamped on a slight uneven surface and dug in through my rag, but it's allgood. Overall I'm stoked as and the gauges are very easy to read on that angle. Could do with some stickers or something for the heater controls
. I have also left room for another gauge but unsure what will go in there at the moment. There's also room for an EWP controller at some point I think
. Not bad for about £5 aye (including paint)

Re: A Kiwis Series 3
Posted: Sat Jun 24, 2017 8:05 pm
by Hobbawobba
I got a little borescope off ebay which plugs into my phone as I though it'd be a good idea for various things. Cost about £6.50. Decided to have a look inside my engine. This is through the spark plug holes (barely fit!)
Rear housing
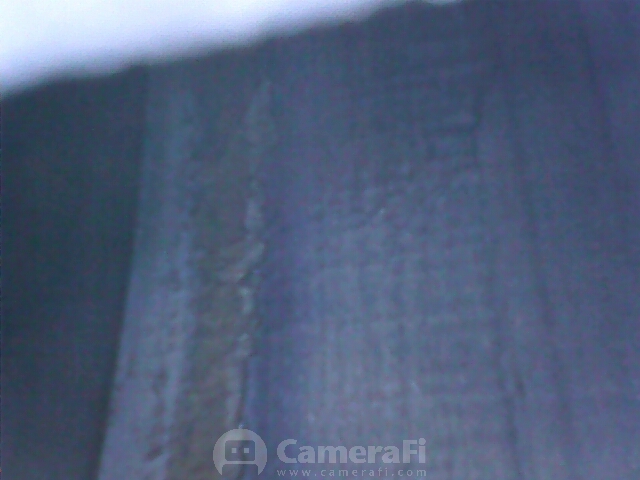
- 170622_150917.jpg (182 KiB) Viewed 5708 times
Front housing
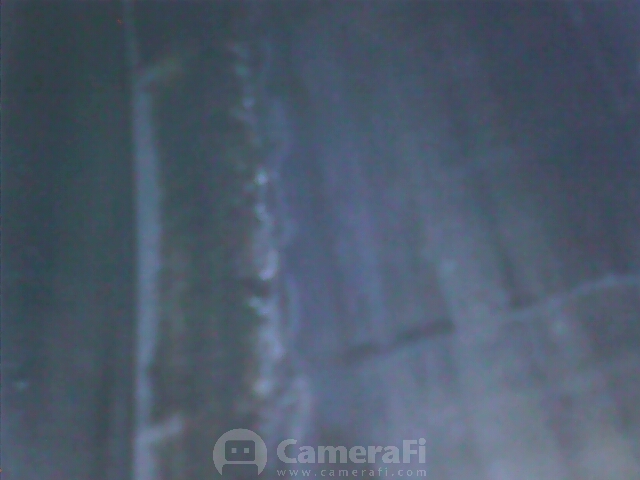
- 170622_151441.jpg (172.33 KiB) Viewed 5708 times
Chrome peel/flaking by the looks of it. Glad I've saved up a nice amount for a new engine
. Just hope this one lasts me until I can sort one out! Ha
Was hoping to have my car finished this weekend. Nearly there. Just outer body panels and then to cap the arches off once they're on. I'm not great at making panels fit though. So I've been getting quite wound up


