Re: Lucky's Series 3
Posted: Mon Oct 21, 2013 12:01 pm
Right, well since it was alleged on another forum I only ever post to talk about myself and my work on the car is barely above maintenance level, some updates...
Since the spare engine came with a set of Gilmer pulleys the first thing was to get them on. Having found a source of spares in the UK and got a couple in (because you wouldn't want to make a modification to your car that could incapacitate it when the nearest replacement was in Sydney, would you?) the next question was how to fit them. I could have just swapped the stock pulleys for the Gilmers but it seemed a wasted opportunity. It was possible to swap the stock viscous fan over to the Gilmers but let's be honest, times have moved on and trusting your engine cooling to essentially a bi-metallic strip and a tiny pin can't be good. So I began doing my research on electric fans...
Now, I know a lot of people source one from a breaker and no disrespect to them, but I wanted to go new. Some things, as I've learned over the years, are a false economy to get secondhand and this seemed like one of those times. The cheapest method is to get a hose insert, solid-state fan switch and some wire. Get a live feed, run it through a relay and take an input from the sensor and get the cheapest eBay fan possible. Next step up from this is an adjustable thermostat kit, most of which use a set-length capillary that inserts into the top hose and a dial setting for the cut-in temperature. The downside of this is that the capillary is a measured length and can't be cut, so the excess needs to be coiled up and always (to my mind) looks ugly, plus it's almost impossible to seal the place where it's inserted into the hose. So after much homework I went for this
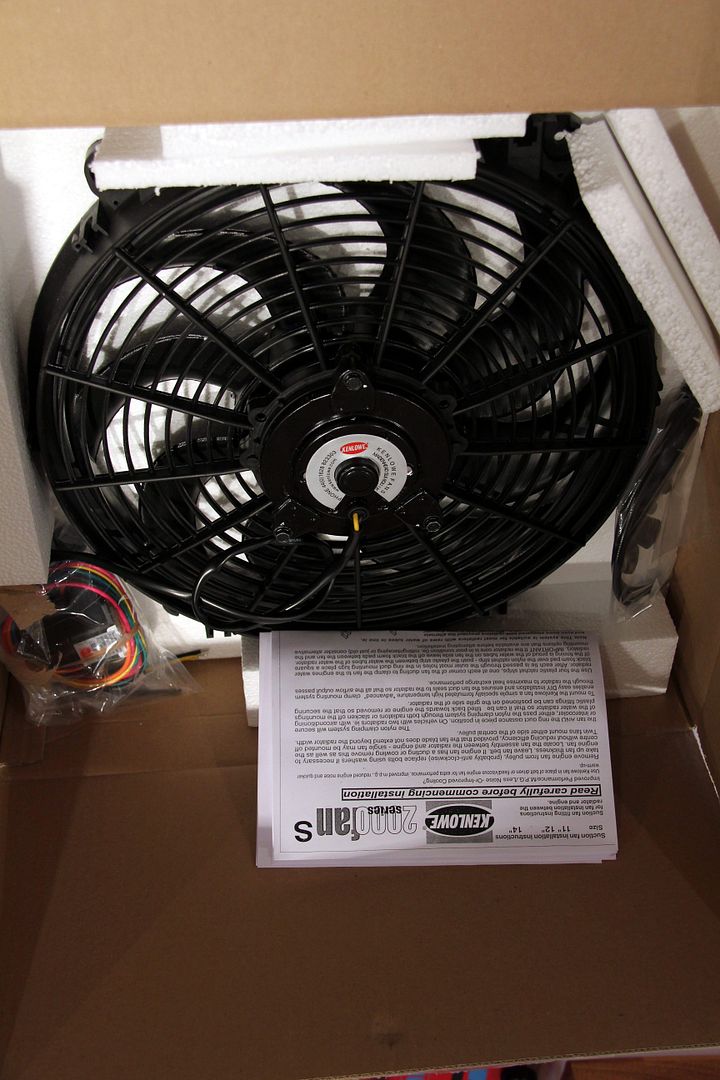
Probably the most expensive solution I could have chosen, but it seemed to me the Kenlowe setup has a few pluses; the wiring is pre-done so literally all you need to do is add terminals and connect it up, which eliminates one area of potential cock-ups; the sensor goes into the matrix between the fins of the core, so there is no actual intrusion into the water system at all, and therefore no weak spots or potential leaks are introduced; it still accommodates adjustability for where the fan kicks in, but you don't end up with a big ugly dial and capillary hanging around; the fans are supposed to be pretty much an industry standard, and should the need ever arise to upgrade to bigger or double-speed fans, they're backwards compatible so future-proof
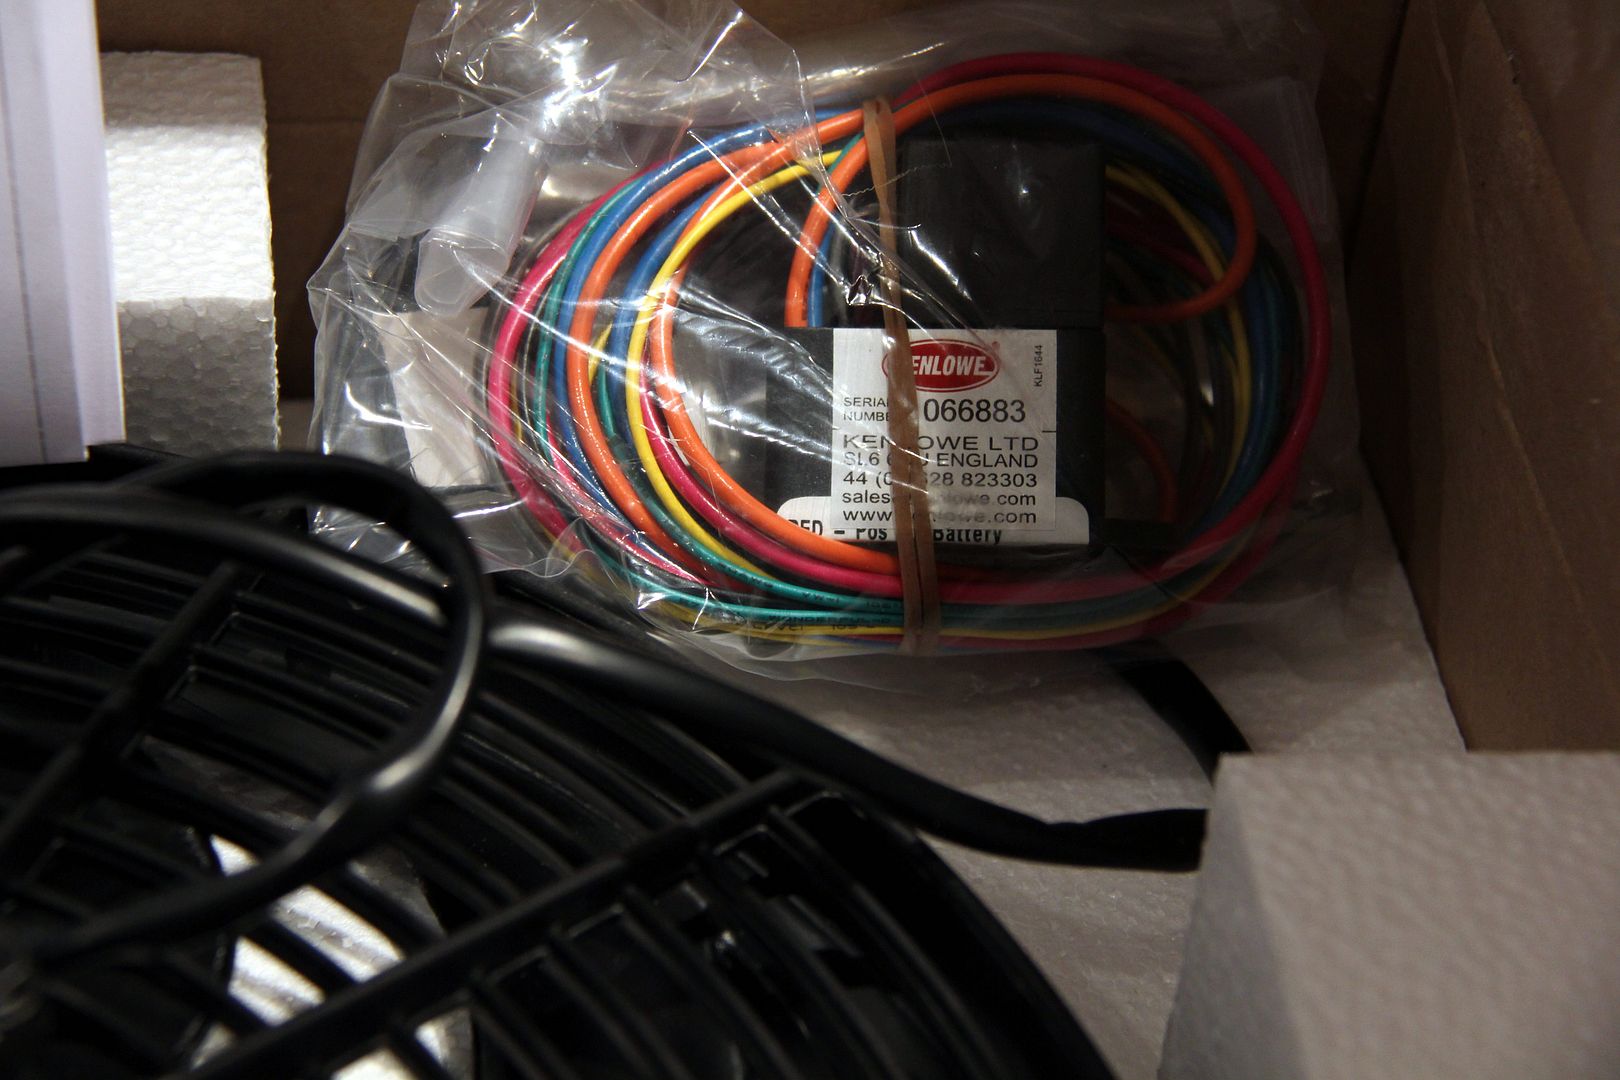
Not very interesting to look at, I grant you. That's all the control modules, wiring, relay and everything in that little bag. Now, the second problem that occurred to me was that the stock temperature gauge isn't actually a temperature gauge; that is, it tells you the engine has a temperature but not what it is. In order to tell whether the fan change was efficient and set where it was kicking in, etc, it seemed prudent to fit an aftermarket gauge that actually gave a numerical figure to the water temperature rather than being on or off, and also that reacted quickly enough to show which direction the temperature was going, and how it reacted to changes. Having used GReddy gauges in my FD for years because I love the simplicity of the readout and how clear they are, but having equally got fed up with how often they break, I decided to go for a motorsport-derived gauge in the FB. The clarity is the same but their reliability is legendary, and it meant there was no danger of ending up with a horrid flashy christmas-tree Defi-style thing that would annoy the hell out of me. So, I got a Stack, electrical rather than mechanical because you don't really want a capillary full of super-heated coolant introduced into your cabin if you can avoid it!
At first I was going to wire the sensor into a hose insert and put it in the top hose, but eventually decided despite the extra faff, it made more sense due to better accuracy to tap a thread into the water pump housing. This would also avoid creating any new leaks and strain on the hose. The gauge itself I looked at fitting an A-pillar pod for (which aren't my favourite look but are undeniably useful and effective) but the A-pillar trim on the FB is too narrow to accommodate even a 52mm gauge pod. So then I investigated making a steering-column cowl pod like the FD-style RE Amemiya ones, but the cowl on the FB is hampered by having the foglight and hazard light switches in one side, and also not really being deep enough to french a gauge pod onto. Eventually Jason at Super 7 came up with the winning suggestion when he had the car in for another reason (more of that later)
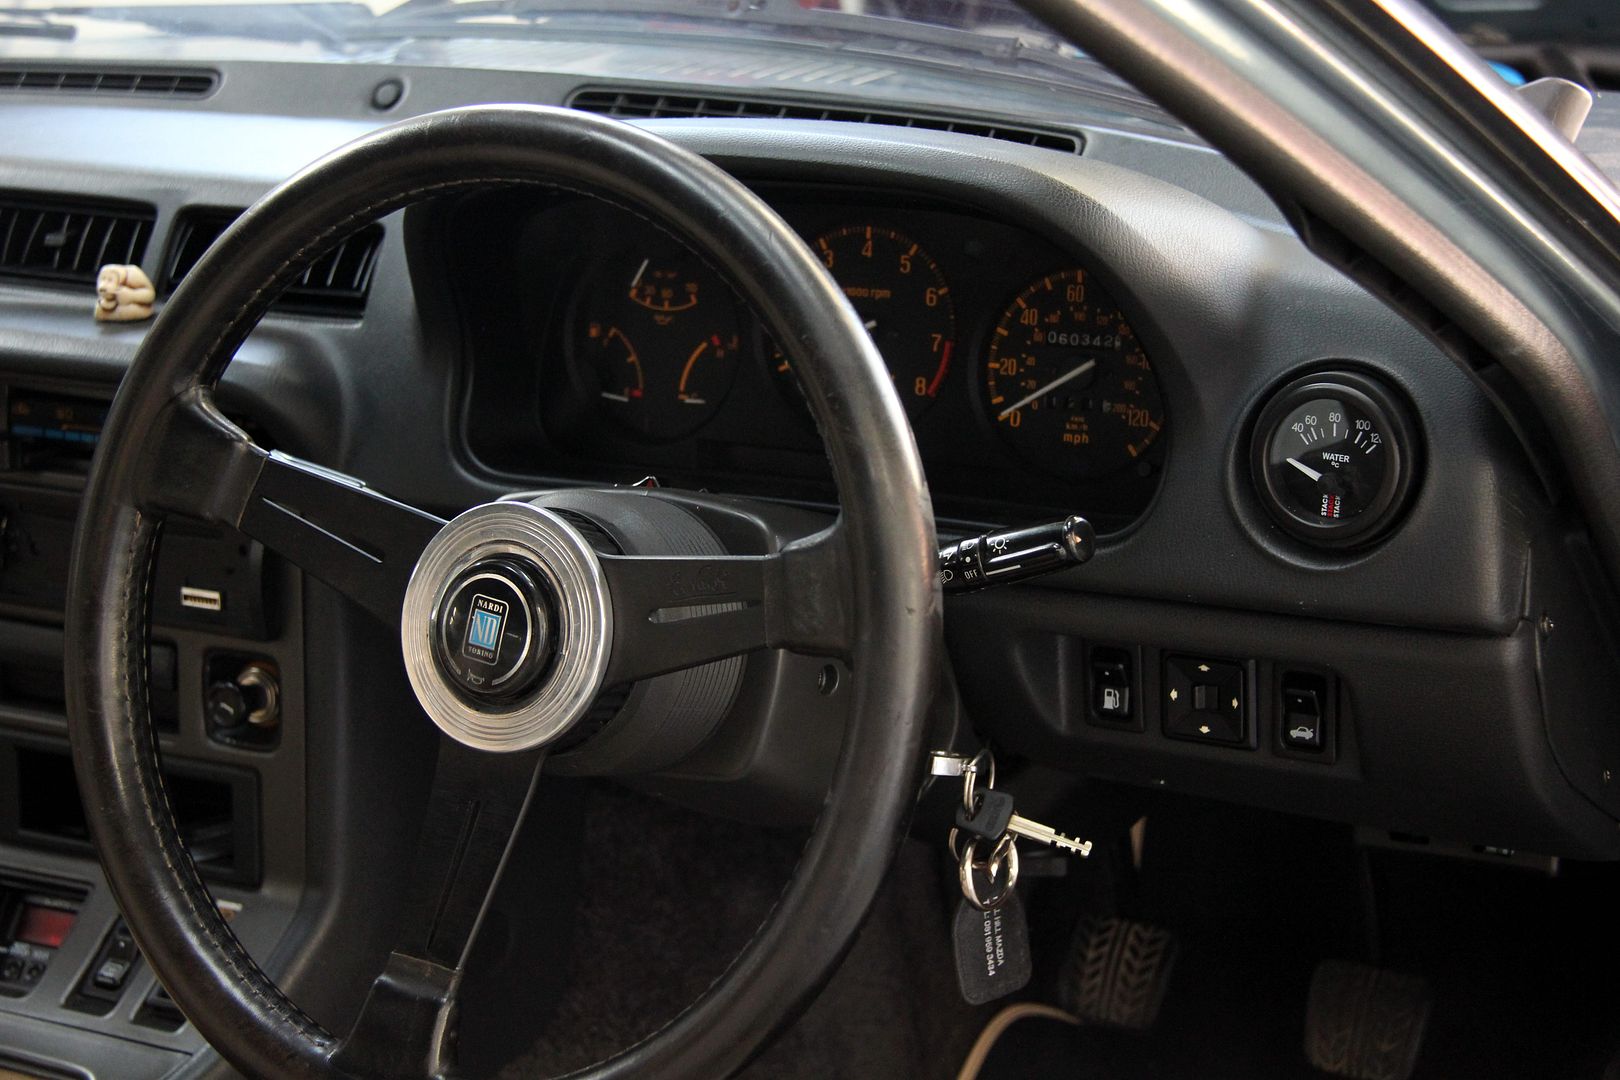
Could have been made for it! One of the reasons the car was at Super 7 was so we could discuss the plans for this;
Due to basically the utter collapse of my entire life it seems likely that the FD will have to go in the near future, and if this happens I'm going to need something a bit more faster than the FB to get my jollies out of. Since I won't be able to afford a faster car, I'll have to make the one I have faster! So, since I ended up with this spare engine it seemed the obvious thing to strip it down and make it more pokey. Discussion of my requirements came up with a few points; 1) the engine couldn't be too much for the car, there's nothing worse than a car that's too fast for its brakes, diff, suspension, etc. 2) no turbos because in my, largely bitter, experience that's the quickest route to unreliability you can find; 3) no bridgeporting because this will likely be my only form of transport so there's no point in it being utterly fuel-hostile and no desire for it to be undriveable at anything less than full honk. If it sits there shuddering and shaking itself to bits embarrassingly every time I stop at traffic lights I won't want to be driving it.
So, the halfway house we arrived at is a big streetport, much like I have on the FD. It may prove to be the solution to nothing and I'll end up with a car that isn't much faster than stock but with all the drawbacks of tuning (poor economy, rough running, bad starting, etc) but I trust Jason's skills in this area and hopefully this won't be the case. At least I'll have a spare engine to fall back on (the original from the car) should the worst happen. Ramon first suggested this approach, of getting a tuned lump in there and keeping the stocker and though I think he might have intended a turbo fire-breathing monster to be the replacement, it seems like the way forward to me in slightly humbler trim. First thing, then, is to strip the engine...
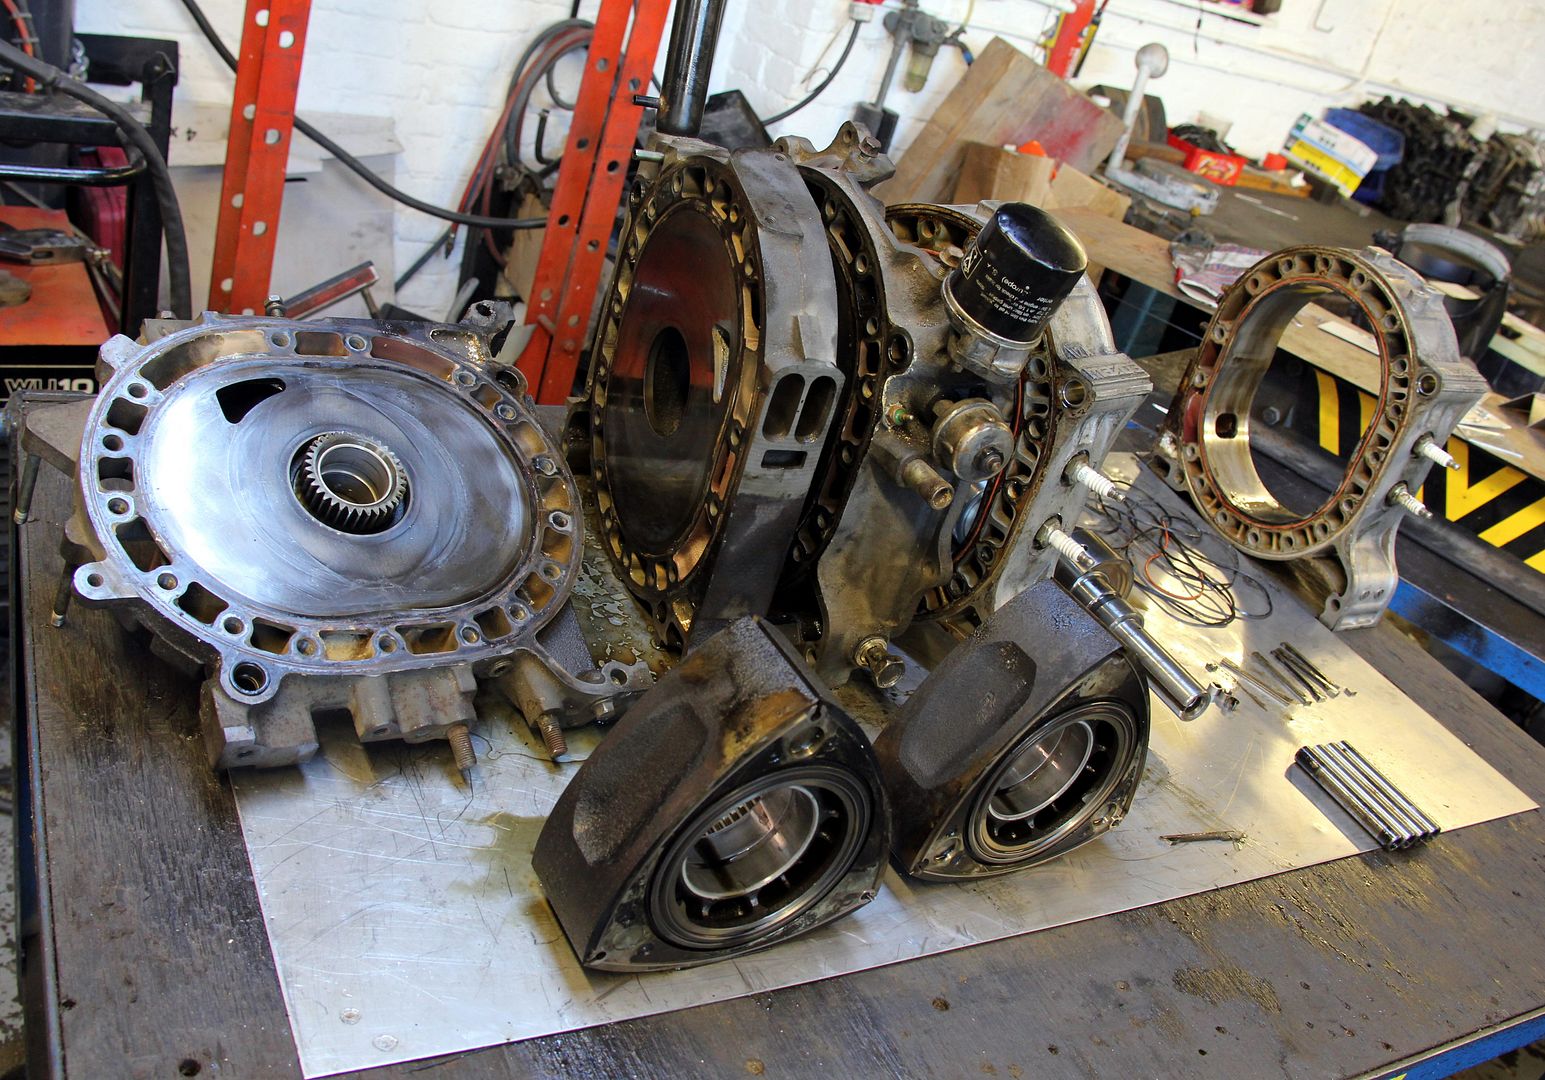
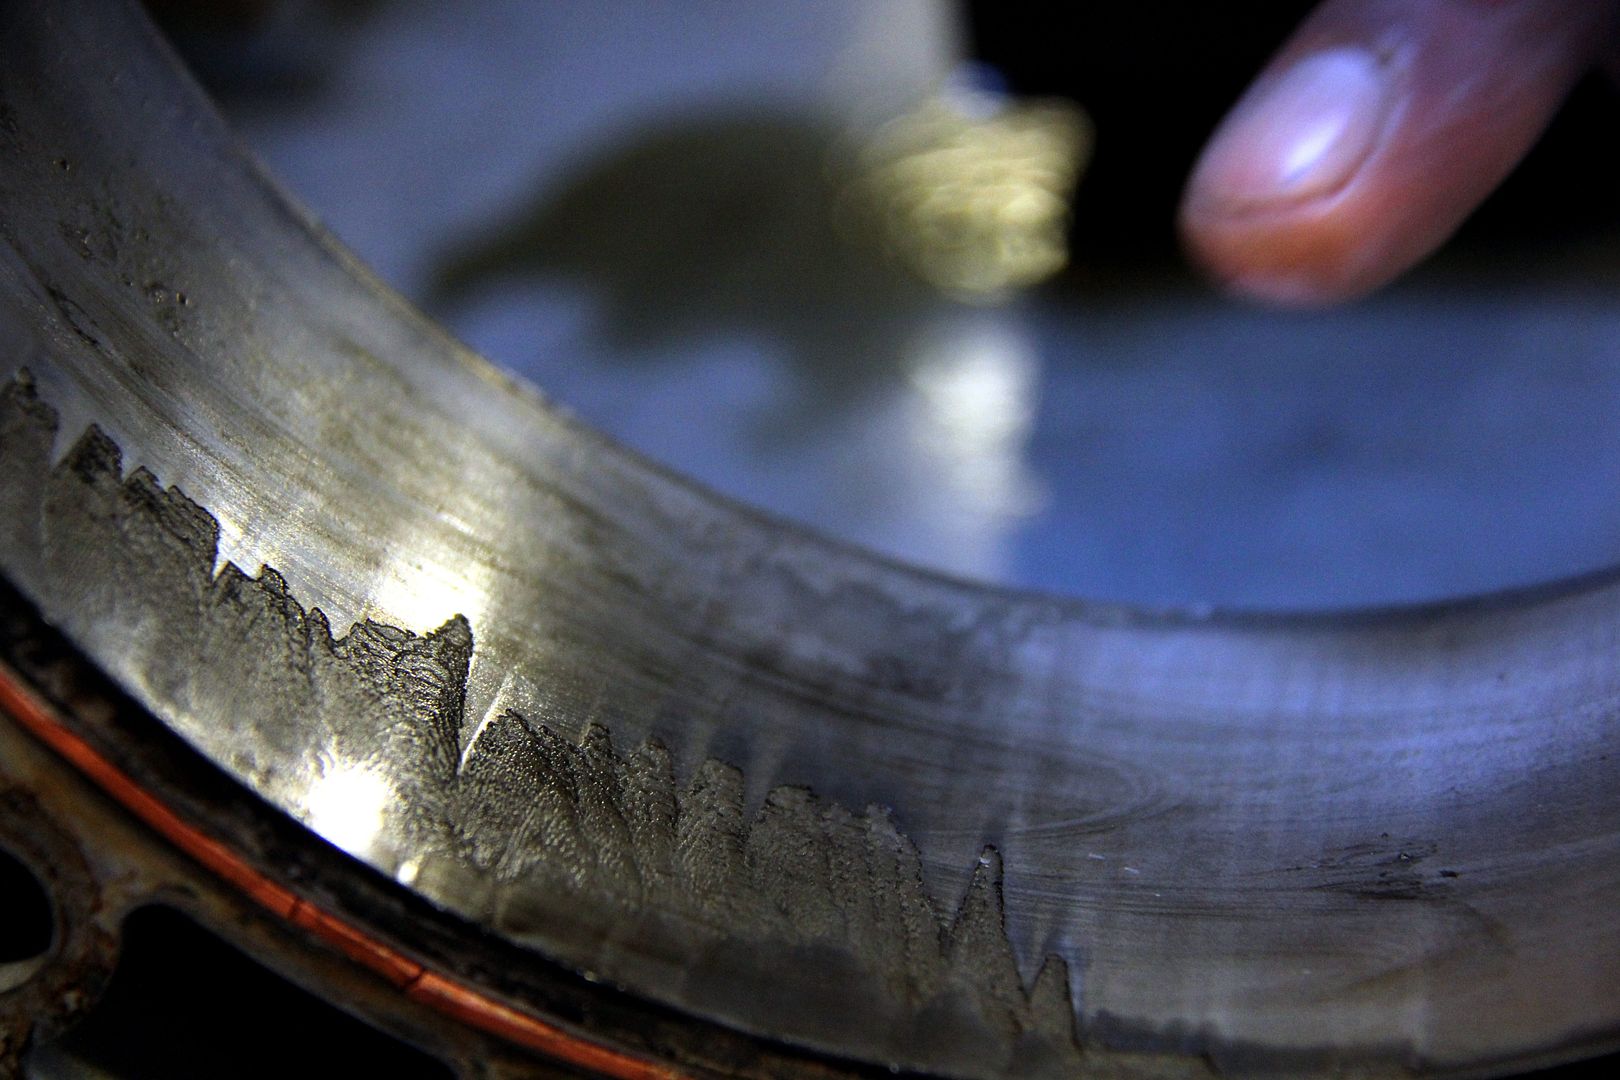
Given that it was of completely unknown provenance and had been kicking around a garage floor half-full of water for God knows how long, it proved in pleasantly good shape. In some areas, lol. The plates are fine, though have that sort of condensation hazing on the lower half that they all seem to acquire;
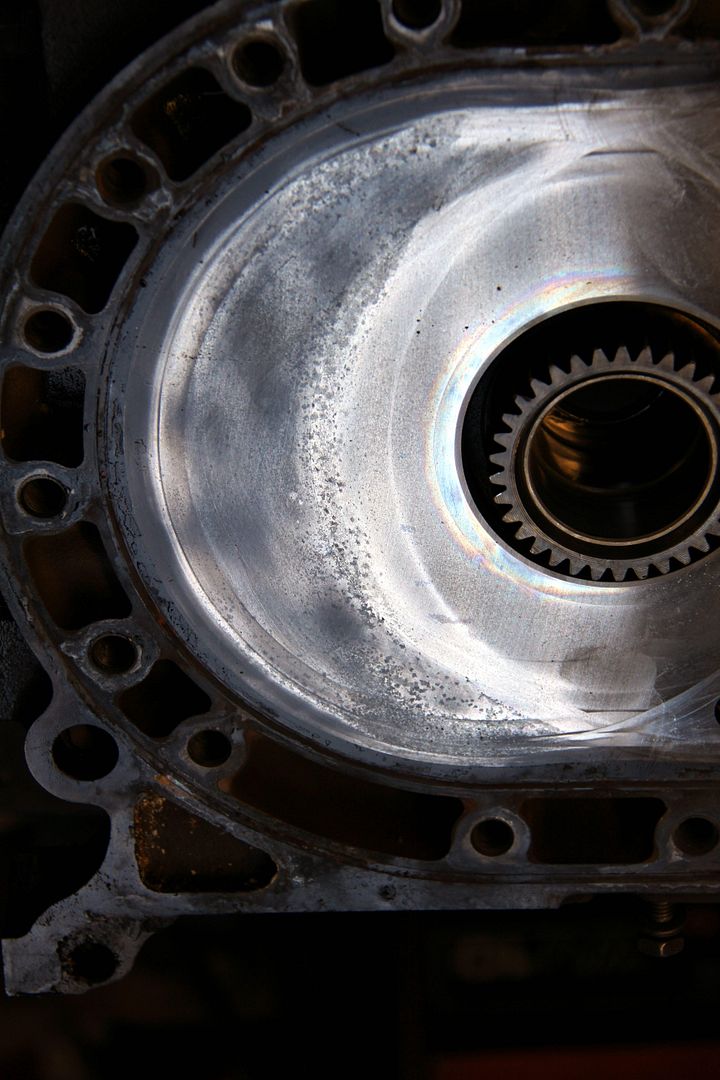
There's a tiny bit of a wear lip, though too fine to be felt by hand. They'll be lapped before they get re-used anyway
One strangeness is that all the ports are the same size across all the plates, whereas I thought the ones in the centre iron would be smaller than the end plates? I might be misguided on this factoid, I'm certainly no expert
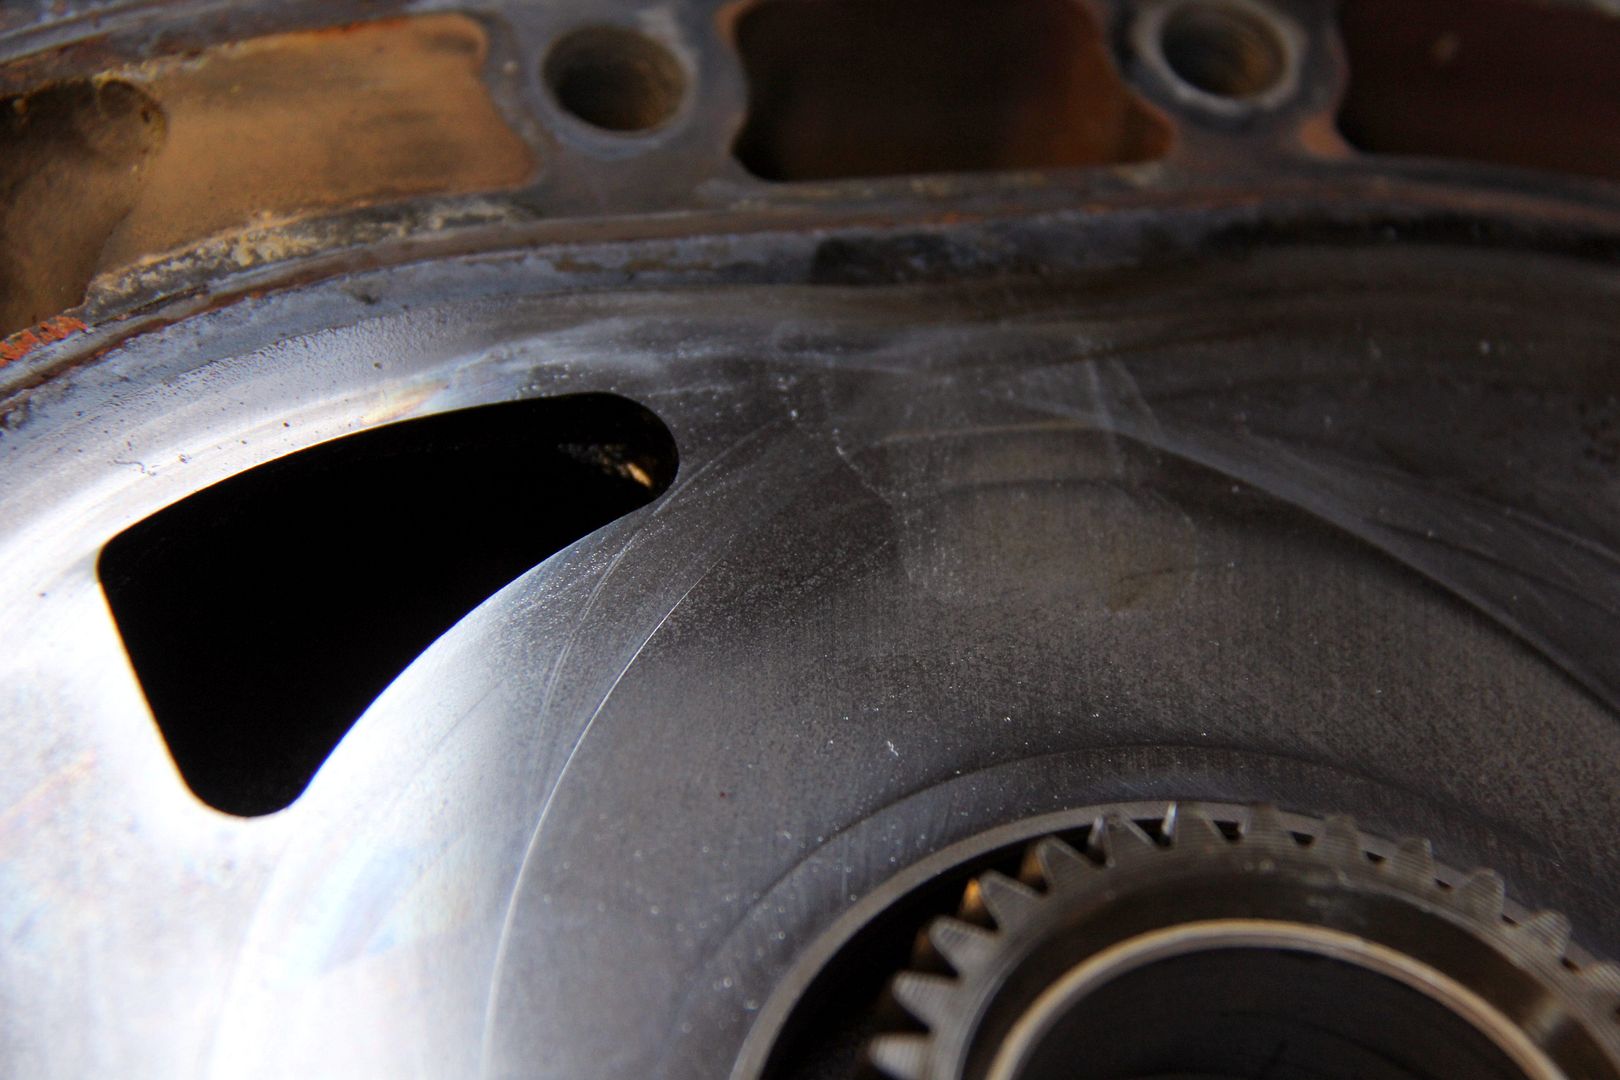
E-Shaft is fine, hardly any signs it's ever been used. Well, on the bearing surfaces anyway, which is what matters, lol
Rotors are fine, too. A couple of stuck seals but they may well have gummed up whilst it's been stood. The guy I got it from was going to put it into a kitcar he was building, but being an engineer he'd had the sense to pour two stroke oil in before storing the engine, so I think he probably saved it from becoming scrap through neglect.

Not even that much carbon, and the seal grooves are all undamaged and good
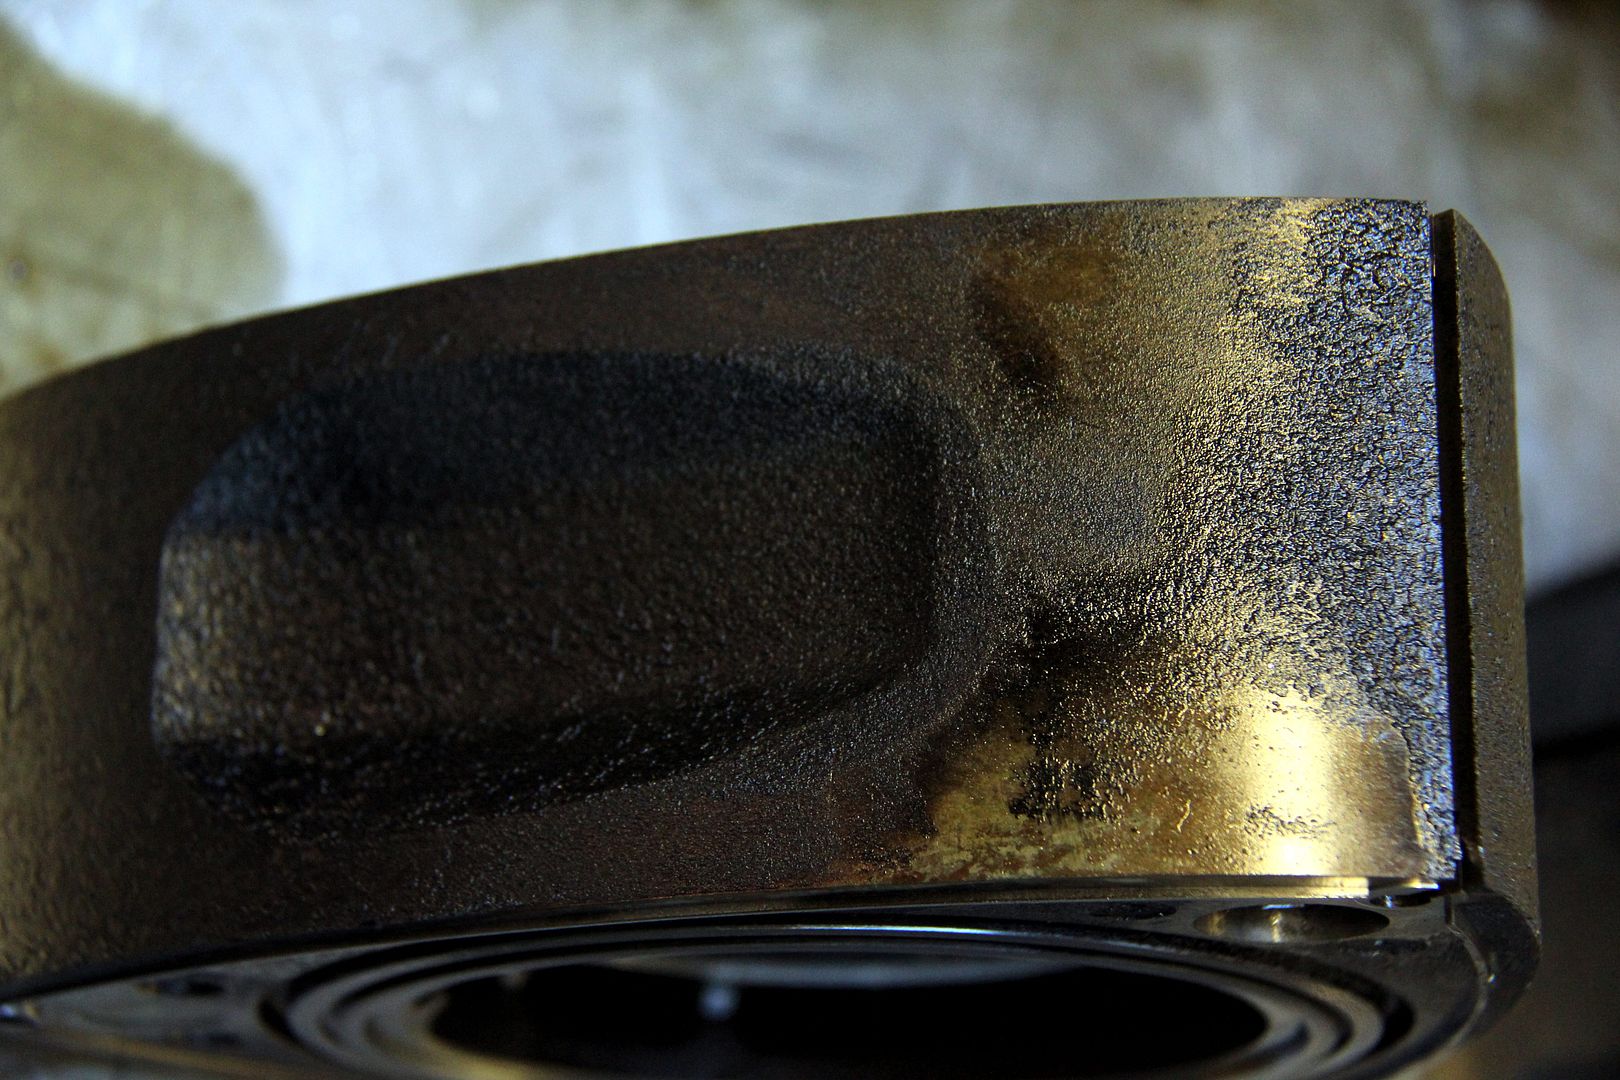
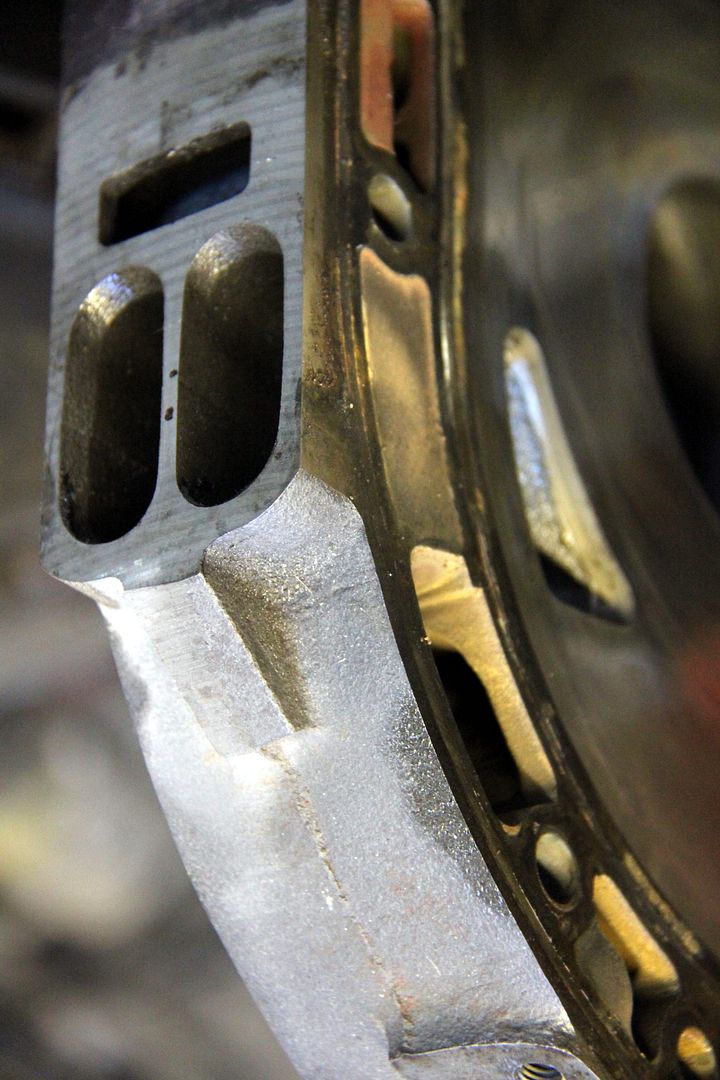
Now for the bad news. The housings are utterly, completely and totally FUBAR. They've done that usual thing of dropping chrome from the edges... and a bit more besides! In fact, I think it's fair to say they're in the worst state I've ever seen Even J, who's seen hundreds over the years, said they were just about the worst

Think the only use these will ever have now is as the legs of a coffee table...
So, a few things to get sorted before this gets rebuilt. Seals, obviously. I'm going to need an oil cooler and lines because this is an earlier engine than my series 3 and therefore didn't have the beehive. But it's not exactly a bad thing to swap away from that thing anyway! Thinking of taking the opportunity to upgrade other stuff like ignition as well, maybe even go to an optical distribution method and suchlike. Then port away!
Since the spare engine came with a set of Gilmer pulleys the first thing was to get them on. Having found a source of spares in the UK and got a couple in (because you wouldn't want to make a modification to your car that could incapacitate it when the nearest replacement was in Sydney, would you?) the next question was how to fit them. I could have just swapped the stock pulleys for the Gilmers but it seemed a wasted opportunity. It was possible to swap the stock viscous fan over to the Gilmers but let's be honest, times have moved on and trusting your engine cooling to essentially a bi-metallic strip and a tiny pin can't be good. So I began doing my research on electric fans...
Now, I know a lot of people source one from a breaker and no disrespect to them, but I wanted to go new. Some things, as I've learned over the years, are a false economy to get secondhand and this seemed like one of those times. The cheapest method is to get a hose insert, solid-state fan switch and some wire. Get a live feed, run it through a relay and take an input from the sensor and get the cheapest eBay fan possible. Next step up from this is an adjustable thermostat kit, most of which use a set-length capillary that inserts into the top hose and a dial setting for the cut-in temperature. The downside of this is that the capillary is a measured length and can't be cut, so the excess needs to be coiled up and always (to my mind) looks ugly, plus it's almost impossible to seal the place where it's inserted into the hose. So after much homework I went for this

Probably the most expensive solution I could have chosen, but it seemed to me the Kenlowe setup has a few pluses; the wiring is pre-done so literally all you need to do is add terminals and connect it up, which eliminates one area of potential cock-ups; the sensor goes into the matrix between the fins of the core, so there is no actual intrusion into the water system at all, and therefore no weak spots or potential leaks are introduced; it still accommodates adjustability for where the fan kicks in, but you don't end up with a big ugly dial and capillary hanging around; the fans are supposed to be pretty much an industry standard, and should the need ever arise to upgrade to bigger or double-speed fans, they're backwards compatible so future-proof

Not very interesting to look at, I grant you. That's all the control modules, wiring, relay and everything in that little bag. Now, the second problem that occurred to me was that the stock temperature gauge isn't actually a temperature gauge; that is, it tells you the engine has a temperature but not what it is. In order to tell whether the fan change was efficient and set where it was kicking in, etc, it seemed prudent to fit an aftermarket gauge that actually gave a numerical figure to the water temperature rather than being on or off, and also that reacted quickly enough to show which direction the temperature was going, and how it reacted to changes. Having used GReddy gauges in my FD for years because I love the simplicity of the readout and how clear they are, but having equally got fed up with how often they break, I decided to go for a motorsport-derived gauge in the FB. The clarity is the same but their reliability is legendary, and it meant there was no danger of ending up with a horrid flashy christmas-tree Defi-style thing that would annoy the hell out of me. So, I got a Stack, electrical rather than mechanical because you don't really want a capillary full of super-heated coolant introduced into your cabin if you can avoid it!
At first I was going to wire the sensor into a hose insert and put it in the top hose, but eventually decided despite the extra faff, it made more sense due to better accuracy to tap a thread into the water pump housing. This would also avoid creating any new leaks and strain on the hose. The gauge itself I looked at fitting an A-pillar pod for (which aren't my favourite look but are undeniably useful and effective) but the A-pillar trim on the FB is too narrow to accommodate even a 52mm gauge pod. So then I investigated making a steering-column cowl pod like the FD-style RE Amemiya ones, but the cowl on the FB is hampered by having the foglight and hazard light switches in one side, and also not really being deep enough to french a gauge pod onto. Eventually Jason at Super 7 came up with the winning suggestion when he had the car in for another reason (more of that later)

Could have been made for it! One of the reasons the car was at Super 7 was so we could discuss the plans for this;

Due to basically the utter collapse of my entire life it seems likely that the FD will have to go in the near future, and if this happens I'm going to need something a bit more faster than the FB to get my jollies out of. Since I won't be able to afford a faster car, I'll have to make the one I have faster! So, since I ended up with this spare engine it seemed the obvious thing to strip it down and make it more pokey. Discussion of my requirements came up with a few points; 1) the engine couldn't be too much for the car, there's nothing worse than a car that's too fast for its brakes, diff, suspension, etc. 2) no turbos because in my, largely bitter, experience that's the quickest route to unreliability you can find; 3) no bridgeporting because this will likely be my only form of transport so there's no point in it being utterly fuel-hostile and no desire for it to be undriveable at anything less than full honk. If it sits there shuddering and shaking itself to bits embarrassingly every time I stop at traffic lights I won't want to be driving it.
So, the halfway house we arrived at is a big streetport, much like I have on the FD. It may prove to be the solution to nothing and I'll end up with a car that isn't much faster than stock but with all the drawbacks of tuning (poor economy, rough running, bad starting, etc) but I trust Jason's skills in this area and hopefully this won't be the case. At least I'll have a spare engine to fall back on (the original from the car) should the worst happen. Ramon first suggested this approach, of getting a tuned lump in there and keeping the stocker and though I think he might have intended a turbo fire-breathing monster to be the replacement, it seems like the way forward to me in slightly humbler trim. First thing, then, is to strip the engine...
Given that it was of completely unknown provenance and had been kicking around a garage floor half-full of water for God knows how long, it proved in pleasantly good shape. In some areas, lol. The plates are fine, though have that sort of condensation hazing on the lower half that they all seem to acquire;

There's a tiny bit of a wear lip, though too fine to be felt by hand. They'll be lapped before they get re-used anyway

One strangeness is that all the ports are the same size across all the plates, whereas I thought the ones in the centre iron would be smaller than the end plates? I might be misguided on this factoid, I'm certainly no expert

E-Shaft is fine, hardly any signs it's ever been used. Well, on the bearing surfaces anyway, which is what matters, lol

Rotors are fine, too. A couple of stuck seals but they may well have gummed up whilst it's been stood. The guy I got it from was going to put it into a kitcar he was building, but being an engineer he'd had the sense to pour two stroke oil in before storing the engine, so I think he probably saved it from becoming scrap through neglect.

Not even that much carbon, and the seal grooves are all undamaged and good

Now for the bad news. The housings are utterly, completely and totally FUBAR. They've done that usual thing of dropping chrome from the edges... and a bit more besides! In fact, I think it's fair to say they're in the worst state I've ever seen

Think the only use these will ever have now is as the legs of a coffee table...

So, a few things to get sorted before this gets rebuilt. Seals, obviously. I'm going to need an oil cooler and lines because this is an earlier engine than my series 3 and therefore didn't have the beehive. But it's not exactly a bad thing to swap away from that thing anyway! Thinking of taking the opportunity to upgrade other stuff like ignition as well, maybe even go to an optical distribution method and suchlike. Then port away!
