Saving My 81 RX7

Restoring, modifying, fettling or just enjoying your RX7 ? Share it with us here...
User avatar
Ghostkls
Posts: 117
Joined: Mon Apr 08, 2013 7:40 am
Location: East London, South Africa

Re: Saving My 81 RX7

Post by Ghostkls »

The white was what sold me when I found it.

The plug wires and filter came from amazon as I couldn't find any locally. The filter is a fram one, went with what I thought to be well priced but reliable for now as I am planning a swap to a 48 IDA as one of my projects. Just enjoy the clean look of the IDA.

Yes, despite the car being in pieces when I bought it, the body is actually not bad at all, couple small holes here and there but was mainly surface rust. As for the electric fan, that was on the car when I got it, I want to swap it for a larger one and build a shroud for it as it looks rather nasty with the way the fan is currently fitted.
Sadly I have no real history on the car, bought it as a non-runner.... Was told the motor was bad, turns out the 13B is in great shape, the only issues were electrical.

The next big project on the car was the only bad rust on the car.... The Drivers Side Door.

The view after sand blasting..... :shock:

Image
Image

Some old school hand bending in progress :lol:

Image
Image

Rust cut away and test fitting the new panel

Image
Image

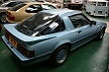
Finally at the point to start bringing it all together

Image
Image

First pieces fitted

Image
Image

Sorry for so many photos of the door but this was quite a project for me and I took about 400 photos so filtering it down is not that easy....
User avatar
Hobbawobba
VIP User
VIP User
Posts: 1938
Joined: Tue Nov 01, 2011 9:44 pm
Location: Worcester - UK
Has thanked: 628 times
Been thanked: 218 times

Re: Saving My 81 RX7

Post by Hobbawobba »

Looking good there! Nice work. The plug leads are a good buy for being so cheap. :) Got mine for £18 or so incl shipping and customs rubbish
Viljami
Posts: 32
Joined: Mon Jan 14, 2013 4:23 pm
Location: Finland

Re: Saving My 81 RX7

Post by Viljami »

Nice work! Very inspiring to see this kind of projects!
User avatar
Ghostkls
Posts: 117
Joined: Mon Apr 08, 2013 7:40 am
Location: East London, South Africa

Re: Saving My 81 RX7

Post by Ghostkls »

Thanks!

Stage two for the door.....

Image
Image

Old school joints..... Has made the door a lot more rigid.

Image
Image

Finally coming together....

Image
Image

Ready for some paint

Image
Image
User avatar
myatt1972
VIP User
VIP User
Posts: 1565
Joined: Thu Mar 31, 2011 10:54 am
Location: Staffordshire Moorlands
Has thanked: 40 times
Been thanked: 37 times

Re: Saving My 81 RX7

Post by myatt1972 »

Now thats just showing off :lol:
Great fabrication work, better than new !
By the way if you like the clean look you could change your fan for a blow through version out of sight in front of the rad.
Keith...
User avatar
Ghostkls
Posts: 117
Joined: Mon Apr 08, 2013 7:40 am
Location: East London, South Africa

Re: Saving My 81 RX7

Post by Ghostkls »

Thanks but it took 4 full weekends of work and several late weekday evenings to get it right. But I am really happy with the results, well worth the effort. I was fortunate that my first job was working in a sheet metal fabrication shop so got to learn a lot of tricks when it comes to projects like this.

As for the blow through fan idea, I have been playing with that idea as well but if I go that route, I want to find the biggest fan that I can fit to cover the Rad and oil cooler.
Lucky
VIP User
VIP User
Posts: 2685
Joined: Mon Nov 07, 2011 8:30 pm
Location: Worthing, UK
Been thanked: 5 times

Re: Saving My 81 RX7

Post by Lucky »

From my recent research in fans, some of them can just be polarity reversed depending on which way you want to mount them, so it might be as simple as swapping the wiring on the fan you currently have and mounting it backwards, if that make sense?

Top work on the resto, by the way, inspirational stuff 8-)
User avatar
Ghostkls
Posts: 117
Joined: Mon Apr 08, 2013 7:40 am
Location: East London, South Africa

Re: Saving My 81 RX7

Post by Ghostkls »

Thanks Lucky, I will look into that as that would make life much easier.

Below are a few photos of the finished door as the car stands now with its "New" old wheels as some one stole one of the 14" of the car a couple months back.

Also here are a few photos of the car next to my daily driver. You don't realize how small a 1st gen is until you photo it next to something else.

Image

Image

Image

Next up on my project list was the rear suspension rebuild....
User avatar
Ghostkls
Posts: 117
Joined: Mon Apr 08, 2013 7:40 am
Location: East London, South Africa

Re: Saving My 81 RX7

Post by Ghostkls »

Here is the rebuild of the rear suspension (D)

This is what it looked like at the start. The watts link had seized solid.... Took me 4 hours to get if free. Ended up drilling the old rubbers out and using a wire buff to remove the rubber that remained.

Image
Image
Image
Image

The new bits waiting to be fitted, including a full energy suspension bushing kit.

Image

Ready for cleaning and primed

Image
Image

Rebuilt out of the car and ready to be installed. All new brake lines including custom stainless braided lines

Image
Image
Image

Installed and ready to run

Image
Image
Image
Image

All I can say is, the energy suspension kit and a new set of shocks was the best purchase I have made so far. It has completely changed the handling of the rex. And the all new brake lines are really worth it.
User avatar
chc
RX7fb LEGEND
RX7fb LEGEND
Posts: 775
Joined: Thu Mar 31, 2011 9:22 pm
Location: Wirral

Re: Saving My 81 RX7

Post by chc »

Fantastic fabrication work - you'll never be out of work with those skills !
Do I take it you have fitted rubber bushes or are they black Poly bushes ? I used poly bushes myself.
Nice resto work on the suspension - powder coated or simply painted items? Not that it matters either way as the finish is cool.
Keep them photos coming 0-0
Cliff

1983 Series 2 - Stardust Blue Elford Turbo
Post Reply

Return to “RX7 Rides and projects”